Introduction
Hello guys, in this
article we will create a login and registration form with database in c#
windows form application .In this article we create a windows form app with
login page, registration page for create new account and home page which show
message that you login successfully .I hope you will like this article .So
let’s start step by step.
Step: 1:- Open your visual studio, here I will use
visual studio 2019.
Step: 2:- Clock on file menu on top of the visual studio,
hover mouse on new and click on project.
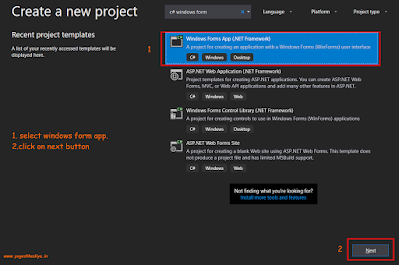
Step: 3:- Search for windows form App.(.Net framework) and
click on next.
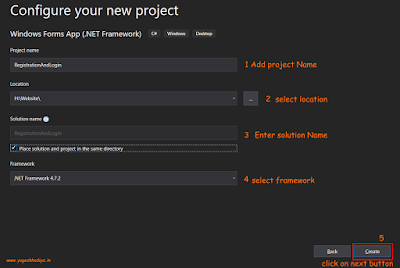
Step: 4:- In this step you have to enter some
details of your application and then click on Create button. Following details
you have to enter.
1.
Project
Name: Name of your
project
2.
Location: Location where you want to store your app
in your local computer.
3.
Solution
Name: This name is display in
solution explore in visual studio.
4.
Framework: Select appropriate framework as your application
require.
Step: 5:- Now your project is created. Open Solution
Explorer .If you don’t see solution explore you can open from View menu on top
or you can try short cut key “Ctrl+W,S”. We need to create some pages for our
application. Right click on solution name then Hover mouse on Add and click on
Add New Item or you can user short cut key “Ctrl+Shift+A”.
Step: 6:- Now you see a dialog where we add our forms.
Select Windows Form, give proper name and click on Add. Add Login, Registration
and Home page in same way.
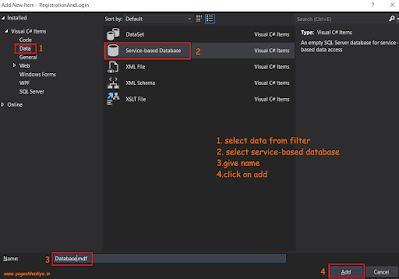
Step: 7:- Now we need to add database in our project.
Right click on solution name then Hover mouse on Add and click on Add New Item
or you can user short cut key “Ctrl+Shift+A”. Select data filter from left side
bar for see item which associate with database. Select service based database,
give name and click on add.
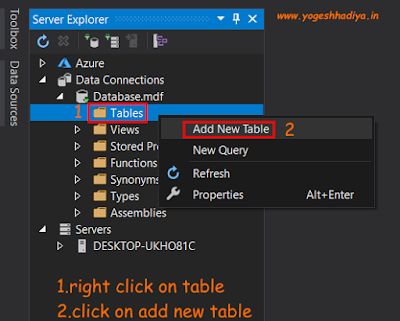
Step: 8:- Now we create a table which we user in
login and registration. Double click on database file from solution explorer.
It will open database file in server explore. Expand your database and right
click on table then click on Add New Table.
Step: 9:-Create table field which you want, here I added
only three field Id, UserName and password where id is auto increment by 1. You
can set it by right click on field name , click on property and find Id
Identity Specification expand it make true (Is Identity) field and give
increment number which increment id by adding this number in last id.
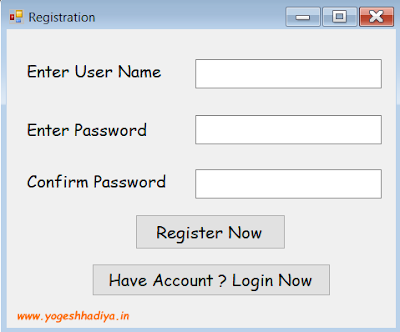
Step:-10:- Now first of all we create Registration
form. So create design of your form as you need. In below image you see how I
design form.
Step: 11:- Now click anywhere on form it will
generate Form_Load event where enter following code. This code create database
connection and open it. In next step you will learn how you get that connection
string which added in SQLConnection Constructor.
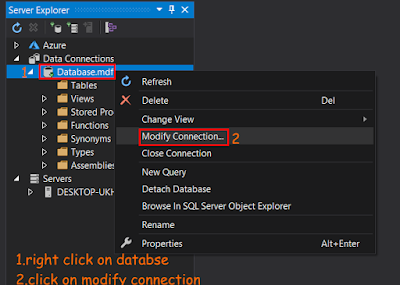
Step: 12:- Go to server Explorer right click on database,
click on Modify Connection.
Step: 13:- Now you see a windows dialog popup click
on advance button. This will open another dialog. But Before that click on test
button and check you database working properly.
Step: 14:- Copy path which show below on this dialog
and close both dialog. Then past this path in form load event. Add @ sign
before this path so you no need to change slash.
Step: 15:- We need to open login page when user click
on login button so enter following code in Login Button click event.
Code Explanation:
1.
Here first we hide the
current form which is registration .
2.
Then we create an object
of login page and show login form using that object.
Step: 16:- Now add following code in registration
button click event
Code Explanation:
1.
First of all we check
that user enter value in all field if yes that continue otherwise show message
using message box.
2.
Then we check if
password and confirm password both are same.
3.
Then we check if any
record/user is already register with that username if not then continue further
otherwise show error message.
4.
In last we insert data
in table using SQLCommand object.
Step: 17:- Now we create a login page here I add two
textbox for username and password and two button for login and open
registration form.
Step: 18:- Click on anywhere in form which generate
Form_Load event add connection code that as show below.
Step: 19:- On Registration button click add following code which open registration
form.
Step: 20:- Add below code in login button click for
redirect user to home page form if user exist.
Code Explanation
1.
Here first of all we
check if user enter value in both field if yes then continue otherwise show
error message.
2.
Then we check if user
exist in our database with that username and password. If user exist then open
home page which we generate in start.
Step: 21:-Change start page as login in Program.cs File.
Step:
22:-Now run your application.
Login.cs
Registration.cs
Home.cs
Program.cs
Conclusion
So, here we create a
simple login and registration page in windows form application. I hope you like
this article, share with your friends.







1 Comments
Great Article Sir 🙏
ReplyDelete